Design Document
1. Introduction
Physical access control to events, such as conferences, workshops and concerts, is logistically a time-consuming task. This project implements a system for access control, based on 2D-bar codes. The basic idea is that the customer gets access to an event and gets a access-granting 2D-bar code. The printed document with the bar code can then at the physical access control site, be checked with a standard laptop and webcam.
The software has a client- and a server-part. The server will have to handle the database-requests and the creating of the ticket, which includes the creating of the unique barcode. The client is responsible of reading the barcode and sending the information to the server. The client then discards or accepts the ticket, depending on the answer from the server. There can be multiple clients communicating with the server at the same time.
The software is designed primarily to be a ticket system and will not include customer handling. How a customer buys or pays a ticket is irrelevant to the system design. However the system will be implemented in such a fashion that adding user or customer handling functions later on is possible.
Design document describes the system in detail, including architecture plan, database design, protocol design, component design (both client and server design) - both in UI level and on programming (classes) level.
2. Glossary
- 2D-barcode - a 2-dimentional QR (quick response) code
- ACL - Access Control List - a computer security concept
- API - Application Programming Interface
- Client (in the scope of this project) - a computer equipped with a web-camera running a software reading 2D-barcodes and associating recognized codes to tickets payed in advance.
- GUI - Graphical User Interface
- HTTP - Hypertext Transfer Protocol - an application-level protocol for distributed information systems.
- LAMP - Linux-Apache-MySQL-PHP - a popular combination of server components used also as a base for the server part in this project.
- Nokkis - name of the project, also a synonum for the executable software, e.g. a Nokkis client.
- REST - Representational state transfer - a style of software architecture where application state and functionality are abstracted into resources.
- Server (in the scope of this project) - a computer storing user registrations and ticket data. A backend for client queries.
- UI - User Interface
- XML - eXtensible Markup Language - a general-purpose specification for creating custom markup languages.
3. Architecture plan
Nokkis is a client-server architecture consisting of two different subsystems, respectively the client and the server.
3.1 Client
The client is a networked computer equipped with a web-camera, running a software for reading 2D-barcodes, and associating recognized codes to tickets payed in advance. The client software is a multi-threaded application that follows loosely the MVC paradigm. It consists of
- a camera component for capturing images
- a barcode reader component for reading barcodes from the images
- a network component for communication with the server
- a virtual server or a client cache component for storing the information received from the server
- an event broadcaster component for handling application events
- good for inter-thread communication
- a component for reading and writing client preferences into XML files
- a client core module acts as the main controller for the other components
- this is done by calling methods from other components and by processing and responding to events
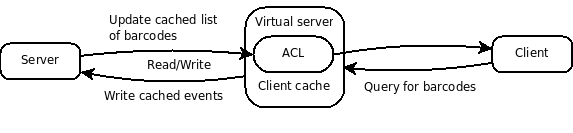
3.1.1 Client-Cache Communication
The client controller uses cache as the intermediate in the client-server communication. The core talks to the client cache, which then communicates directly with the server. The core is agnostic of the communication protocol used by the cache and the server.
3.2 Server
The server is designed to function over LAMP environment. The server is a networked computer storing the user registrations and ticket data. The server software consists of
- a database for storing event and ticket information
- an event creation user interface
- a HTTP network layer for communication with the clients
3.2.1 Server-Client Communication
The server responds to the queries made by the clients. The client-server communication is done via HTTP, using XML as the request format.
4. Database design
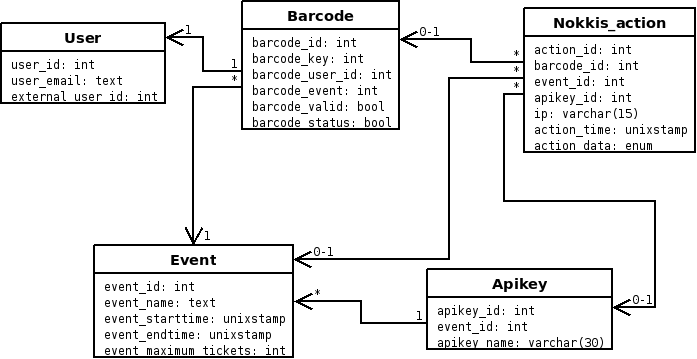
The database is designed to be used with MySQL, but should work with either straight or with minimal changes on other database system. The database consists of five tables: user, barcode, nokkis_action, apikey and event.
The event table consists of all the created events and their information, including the time of the event, description, maximum tickets to be sold and the name of the event. None of the information is compulsory, the database creates an unique id for each event.
The barcode table consists of all the created barcodes. Every barcode has a barcode_key, which is the information the barcode contains. The barcode_valid attribute tells if the ticket is valid or not (if it's paid for) and the barcode_status tells if the ticket is used or not. Every barcode also have a unique id which is auto incremented by the database and they are also linked to an event and a user.
The user table has a auto incrementing id, a optional user_email and a external_user_id for future uses.
Then there are a apikey table, which consists of the apikeys, which clients uses for authentication. The table has a apikey_id, which is auto incremented and unique, a apikey_name, which is the apikey, and a event_id, which links the apikey to an event.
The nokkis_action table contains all the actions or changes done to barcodes and events. They are linked to the corresponding event, barcode and apikey. Also contains from which ip the change was made, at which time the change was done and what the change was. The change can be one of : event_created, event_modified, barcode_created, barcode_used or barcode_deleted.
5. Protocol design
Client and server communicate over REST API. See Appendix E for detailed API description.
5.1 QR code data layout
QR code consists of following data (integers are little endian):
Header: "NKKS" (4 bytes)
Event id: uint32 (4 bytes)
Barcode key: uint32 (4 bytes)
6. Components
The software has a client and a server part. The client is responsible for reading the barcode and sending the information to the server. The client will also have a cache that works like the server, when the client is not connected to the internet. The cache will answer the client in the same way as the server would and will update the server and it's own information when connected to the internet. The server will, when sent a barcode-request, go through it's database and on the retrived information send an answer to the client. When the client gets the answer it will give the necessary information to the user.
6.1 Client
Client captures images from the webcam stream frequently. Captured images are passed on to the barcode recognition component. If a valid barcode is recognized, the cache is searched for a corresponding ticket. If one is found, and it's valid and unused, it will be marked used and user will be informed about granted access. Otherwise user will be informed about a failure.
Client will be implemented in Java 1.5 and it will run on Java Virtual Machine.
6.1.1 Image capturing
Images are captured with a webcam using OpenCV computer vision library through a custom Java-wrapper.
6.1.2 Barcode recognition
Barcodes are recognized using ZXing 1D/2D barcode image processing library.
6.1.3 Networking and cache
The cache data is synchronized with the server data as often as possible. When the application starts, a request is sent to the server to receive all data for the events that client is configured for. After this, updated event data is being requested in set intervals (defaulting to once per minute). Whenever a barcode is read, the client sends a request to server to use the barcode.
All the network requests are also cached internally. If there's problems with network connectivity, the client still runs as expected, using the data from cache instead of requests over the network to the server.
6.1.4 Client UI design
Client is used through a simplistic GUI. Basic layout remains the same thorough the whole application running time: On top of the screen there's a title box stating the application status (for example "Checking barcode" or "Waiting for a barcode"). Below the title box there's a camera window showing the web-camera output, in realtime if possible. The camera output is there to help the user adjusting the camera and making sure the tickets are placed in suitable place for reading. On the left pane there's an additional information box that's used for indicating the status after reading a barcode.
6.1.4.1 Client default view

6.1.4.2 Client: Reading barcode succeeded
A positive success sound is being played together with the success icon.

6.1.4.2 Client: Reading barcode failed
A negative "failed" sound is being played together with the failed icon. The whole background flashes possibly in red to notify the user about failure.

6.2 Server
Server is backend for client and admin interface to events and tickets. Data between client-server and admin web interface-server is transported with http protocol in xml format. Data transfer resembles REST (Representional state transfer) protocol. Protocol in defined in server API.
6.2.1 Server UI design
An admin interface for maintaining the events, clients and checking ticket logs is going to be implemented as a separate website.
6.2.1.1 Login page

The login page has a form with text fields for username and password. If correct username and password are given, the user will be forwarded to Main view after clicking "Login" button, otherwise the form will be shown again with an highlighted error message stating the reason why the login failed (for example "false password").
6.2.1.2 Main view

The main view has links to adding new events, viewing ticket log and logout from the system. Underneath the links there's a listing of events in the database. This list can be sorted by different columns by clicking the column name (for example "name" or "start date"). The event listing can be also filtered by selecting a year from a drop-down list, or just listing all events by default. When clicking an event name in the listing, user will get to the Update event page. Selecting "logout" will take the user back to the login page.
6.2.1.3 Adding events

Add event page has a back link to the main view and a form with all event related data: Event name, event code, ticket limit, start time and date, end time and date. The form can be edited both in text form and by selecting options from a drop-down list. When user presses "Add event" button, the event data will be checked. If the data was alright, the event will be added to database together with a success message. If there was any false input, a highlighted error message is show to the user stating the reason (for example "Event code must be alphanumerical and contain only character A-Z, 0-9 and _")
6.2.1.4 Modifying events

Update event page has a back link to the main view and a form with all event related data: Event name, event code, ticket limit, start time and date, end time and date. The form can be edited both in text form and by selecting options from a drop-down list. The form is pre-filled with current event data. When user presses "Update event" button, the event data will be checked. If the data was alright, the event will be modified in the database and a success message is shown to the user. If there was any false input, a highlighted error message is show to the user stating the reason (for example "Event end date must be after event start date")
6.2.1.5 Viewing ticket logs

Ticket log listing page has first a back link to the main view. Next there's a search form for finding a specific ticket id or ticket action. Finally there's a log listing of all actions that have taken place. The listing can be filtered by a pull-down list by selecting a specific event, ordering the listing by clicking column names on top of the list (for example "event name"). User can also set an amount of log entries shown per page and browse different pages with a given page number.
6.2.1.6 Adding tickets
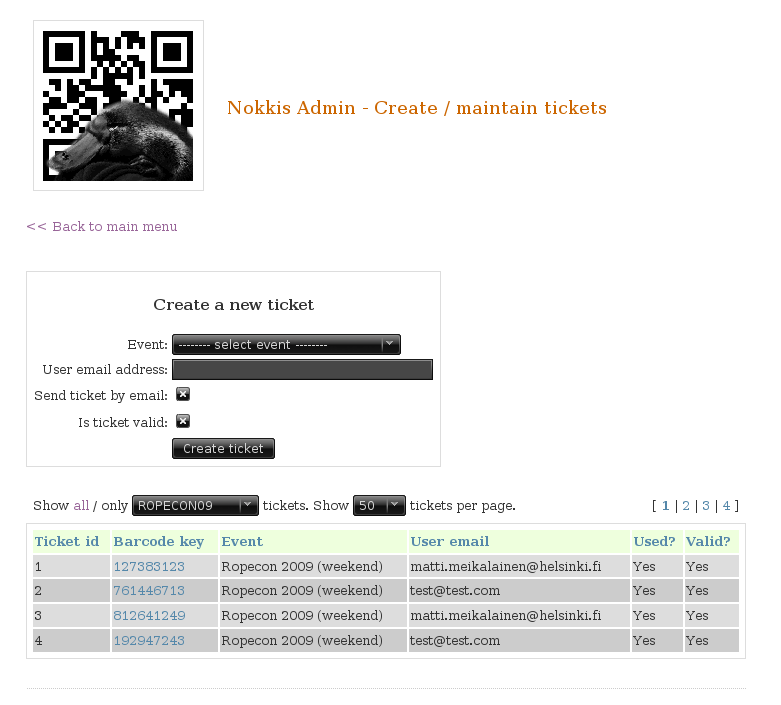
The page has a link back to the main view to start with. Under that, there's a form for creating new tickets. You can chose the event from a list, give a e-mail adress that will be connected to the barcode and a checkbox to determine if the ticket is to be valid or not. Under the form there is a view listing barcodes. You can list all the barcodes or the barcodes associated with an certain event. By clicking on a certain barcode you can modify that ticket.
7. Main classes
The classes are described here only on a very general level. For function-level details, see the client javadocs at the appendices section.
7.1 Client
The client is divided into six main modules: core, video, barcode, gui, event and cache. Each of these modules have their own main classes that are primarily responsible for the module logic. The interaction between all classes is designed to be thread-safe, and passing critical data from one class to another is handled by events.
7.1.1 core.NokkisMain
The core module handles the general application logic by requiring other modules to provide their respective functionality and by responding to their events.
7.1.2 video.FrameGrabber
FrameGrabber provides the video frame capturing services. To receive the grabbed frames, the user needs to register a FrameGrabEvent event listener to the FrameGrabber's EventBroadcaster. FrameGrabber spawns its own thread.
7.1.3 barcode.BarcodeReader
BarcodeReader provides the barcode reading services. Barcodes are read from Image objects in a separate thread. To receive the barcode information, the user needs to register a BarcodeReadEvent event listener to the BarcodeReader's EventBroadcaster.
7.1.4 cache.Cache
The Cache class stores internally both the events and barcodes in Hashtables. The Cache class main thread controls the internal flow, and polls the server systematically. New threads will be created when a barcode is read and the core application calls the Cache. These threads will die after a response is delivered with a BarcodeCheckEvent().
Cache has a few helper classes: Most important is XMLParser, that creates, sends, receives and parses XML documents - either from/to file or from server. There's also two event classes: BarcodeCheckEvent that is used when a barcode is checked either from cache or from the server, passing the information back to the core application. HttpRequestEvent is used by XMLParser to inform Cache class when the server responds or timeouts.
7.1.5 event.EventBroadcaster
EventBroadcaster provides a type safe way to handle inter-thread communication. Each broadcaster broadcasts only certain type of events. Users register their listeners to EventBroadster to listen for corresponding events.
7.1.6 gui.Gui?
The Gui class implements the graphical user interface of the client application. Communication between Gui and the rest of the application works through Core class.
7.2 Server
Server components are RESTful API, MySQL database and admin interface. API is in XML and is sent over HTTP. Actions are defined in Appendix 8.2. Mysql database definition is in Appendix 8.3. Admin interface is written in PHP.
8. Appendices
- Appendix A: XML Schema
- Appendix B: Server API
- Appendix C: Client javadocs
8.1 Database design - SQL create clauses (Appendix D)
CREATE TABLE barcode(
        barcode_id INT NOT NULL AUTO_INCREMENT,
        barcode_key INT NOT NULL,
        barcode_user_id INT,
        barcode_event INT NOT NULL,
        barcode_status BOOL,
        barcode_valid BOOL,
        PRIMARY KEY(barcode_id),
        FOREIGN KEY(barcode_user_id) REFERENCES user (user_id) ON DELETE CASCADE,
        FOREIGN KEY(barcode_event) REFERENCES event (event_id) ON DELETE CASCADE
        );

CREATE TABLE nokkis_action(
        action_id INT NOT NULL AUTO_INCREMENT,
        event_id INT,
        barcode_id INT,
        apikey_id INT,
        ip VARCHAR(15),
        action_time INT NOT NULL,
        action_data ENUM('event_created', 'event_modified', 'barcode_created', 'barcode_used', 'barcode_failed', 'barcode_deleted'),
        PRIMARY KEY(action_id),
        FOREIGN KEY(event_id) REFERENCES event (event_id) ON DELETE CASCADE,
        FOREIGN KEY(barcode_id) REFERENCES barcode (barcode_id) ON DELETE CASCADE,
        FOREIGN KEY(apikey_id) REFERENCES apikey (apikey_id) ON DELETE CASCADE
        );

CREATE TABLE event(
        event_id INT NOT NULL AUTO_INCREMENT,
        event_name TEXT,
        event_description TEXT,
        event_starttime INT,
        event_endtime INT,
        event_maximum_tickets INT,
        PRIMARY KEY (event_id)
        );

CREATE TABLE apikey(
        apikey_id INT NOT NULL AUTO_INCREMENT,
        event_id INT NOT NULL,
        apikey_name VARCHAR(30) NOT NULL,
        PRIMARY KEY(apikey_id),
        FOREIGN KEY(event_id) REFERENCES event (event_id) ON DELETE CASCADE
        );

INSERT INTO apikey (event_id, apikey_name) VALUES (-1, "NOKKIS_ADMIN");

CREATE TABLE user(
        user_id INT NOT NULL AUTO_INCREMENT,
        external_user_id INT,
        user_email TEXT,
        PRIMARY KEY (user_id)
        );
8.2 Client-server protocol (Appendix E)
All requests start with url to nokkis api. For example http://example-nokkis/API. Nokkis REST actions are
NOKKIS URL: (empty)
GET return list of events
POST create new event
KEY URL: /KEY
GET list all apikeys and related events
CLIENT URL: /CLIENT/<apikey>
GET return cache file for client
EVENT URL: /<eventid>
GET return event description
PUT update event
DELETE delete event
EVENT_LOG URL: /<eventid>/LOG
GET return all event updates
APIKEY_BY_EVENT URL: /<eventid>/KEY/<apikey>
GET return all event's apikeys
BARCODE URL: /<eventid>/BARCODE
GET return all event's barcodes
POST create new barcode
BARCODE_BY_KEY URL: /<eventid>/BARCODE/<key>
GET return barcode's data
PUT use barcode
DELETE invalidate barcode
BARCODE_LIST URL: /<eventid>/BARCODE/LIST/<start>(,<end>)
GET return all barcodes or between start and end or start to end
BARCODE_LOG URL: /<eventid>/BARCODE/LOG
BARCODE_ID_LOG