User Manual and Support Document
1. Introduction
This document acts both as a user manual and a support document for Nokkis - a distributed ticket system utilizing QR codes.
2. Installation
Nokkis consists of two distinct subsystems: the client, that takes care of checking the tickets; and the server, that manages the tickets database and communicates the latest data between all connected clients. While the clients can act as standalone applications, it's highly recommended to install and configure both systems.
2.1 Client
To compile the Nokkis client application, Java 1.5 (or later), gcc 4.0 (or later) and OpenCV 1.0 (or later) has to be installed on your computer. Ubuntu Linux 9.04 is the preferred operating system, but the client should also work on Windows XP, Windows Vista or Mac OS X 10.5.
2.1.1 Client installation on Ubuntu 9.04
- Install OpenCV from the command-line:
sudo apt-get install libcv-dev
- Install Java Development Kit 1.5 or later. e.g.:
sudo apt-get install sun-java6-jdk
- Make sure you have JAVA_HOME environment variable set:
export JAVA_HOME=/usr/lib/jvm/java-6-sun
- Compile and run Nokkis client with:
./build.sh run
2.1.2 Client installation on Mac OS X
- First install Xcode 3 and MacPorts.
- Then install OpenCV from the command-line:
port install opencv
- Now compile and run Nokkis client with:
./build.sh run
2.1.3 Client installation on Windows
- Install MinGW and MSYS. Add MinGW and MSYS bin directories to your PATH environment variable (go to Control panel -> System -> Advanced -> Environment variables).
- Install MinGW gcc version 4.3 or later (not included in MinGW currently).
- Install Apache Ant.
- Set ANT_HOME environment variable pointing to the directory where you installed it
- add Ant's bin directory to your PATH.
- Install Java 1.5 SDK or later.
- Make sure you have JAVA_HOME environment variable set. If not, set it to point to your Java SDK directory.
- Install OpenCV (1.1-pre or later recommended).
- Add Nokkis lib/opencv/win32 directory to your PATH.
- Compile and run Nokkis client from the command-line with:
util\gant-1.6.0\bin\gant.bat run
2.2 Server
Nokkis server application requires MySQL 5 and PHP 5 with PEAR and HTTP Request package (http://pear.php.net/package/HTTP_Request) to be installed. A LAMP setup (Linux-Apache-MySQL-PHP) is recommended, but in practice any other operating system and web server combination should work, too.
2.2.1 Server installation step by step
These instructions assume you're using LAMP as the server environment.
- Install and configure Apache. Make sure you have AllowOverride All for the directory where Nokkis server is going to be installed.
- Install MySQL 5. Make sure that you use UTF-8 as the default encoding!
- Install PHP 5 + PEAR. Enable MySQL and GD lib extensions in PHP (php.ini):
extension=php_gd2.dll
extension=php_mysql.dll
- Install PEAR HTTP Request module:
pear install HTTP_Request-1.4.4
- Extract the Nokkis server files (nokkis-server.tar.gz) in any directory that is reached by the webserver (or configure your httpd.conf accordingly).
- Create a MySQL database called "nokkis" and add a MySQL user with needed privileges:
CREATE DATABASE nokkis;
CREATE USER 'nokkis'@'localhost' IDENTIFIED BY 'nokkis4ever';
GRANT SELECT,INSERT,UPDATE,DELETE ON nokkis.* TO 'nokkis'@'localhost';
- Setup the Nokkis database - on command line:
mysql -u<user> -p<password> nokkis < nokkis.sql
- Edit nokkis-config.inc.php where needed:
<?php

  // PEAR include path
  $config["pear_include_path"] = "/opt/local/lib/php";

  // Nokkis server url & apikey
  $config["nokkis_server_base_url"] = "/nokkis/REST/";
  $config["nokkis_url"] = "http://localhost/nokkis/REST/API/";

  $config["nokkis_apikey"] = "NOKKIS_ADMIN";

  // Nokkis admin login & password
  $config["auth_login"] = "admin";
  $config["auth_password"] = "nokkis4ever";

  // Nokkis database settings

  $config["db_login"] = "nokkis";
  $config["db_password"] = "nokkis4ever";
  $config["db_database"] = "nokkis";
  $config["db_host"] = "localhost";

?>
- Edit .htaccess file in the REST sub-directory so that it has the correct URL to Nokkis REST/nokkis-api.php file:
RewriteEngine on RewriteCond %{REQUEST_URI} !\.(php|css|js|gif|png|jpe?g)$ RewriteRule (.*)$ /nokkis/REST/nokkis-api.php [L] <Limit PUT DELETE PATCH PROPPATCH MKCOL COPY MOVE LOCK UNLOCK> Order allow,deny Allow from all </Limit> - Test the Nokkis server installation by browsing to the Nokkis REST API URL - if the installation succeeded, you'll see the following reply:
<nokkis>

    <error id="30">Apikey not found</error>
</nokkis>
- Test the Nokkis server admin by browsing to http://<nokkis-server-url>/admin/
3. Usage instructions
This chapter provides short guidelines on how to use both the Nokkis client and server parts.
3.1 Server administration
The included server administration interface has pages to add and modify events, creating tickets, managing the clients and browsing log messages.
3.2 Client configuration
The Nokkis client uses XML-formatted files to initialize itself. The only file the user needs to edit by hand is normally the client configuration file (config.xml). The client tickets file (tickets.xml) can be downloaded from Nokkis server admin clients page. The client cache file (cache.xml) contains always the latest tickets data. If the client is not connected to internet, or there's temporary network problems, you can edit or add tickets manually in cache file. Note that if a network connection to server is resumed, the server overrides manual changes to cache file!
The client processes always the tickets data in following order:
- Read data from the tickets file (tickets.xml).
- If a cache file (cache.xml) exists, update the tickets data from there.
- If using Nokkis server and there's internet connectivity, update the tickets data from there.
- Periodically update tickets from Nokkis server and write the cache contents to file (cache.xml).
3.2.1 Config.xml format
Any missing client configuration parameters results in using default values as listed below:
<?xml version="1.0" encoding="UTF-8"?>
<nokkis>
  <client>
    <!-- file used for logging - leave this empty for printing all the output to console -->
    <logFile></logFile>
    <!-- file used to loading initial tickets data - leave this empty if no local tickets are available -->
    <ticketsFile>tickets.xml</ticketsFile>
    <!-- file used for writing/reading cache data -->
    <cacheFile>cache.xml</cacheFile>
    <!-- camera index - default value -1 let's OpenCV choose the camera, otherwise camera indexes start normally from 0 onwards -->
    <cameraIndex>-1</cameraIndex>
    <!-- run application in fullscreen? 0 = windowed, 1 = fullscreen -->
    <fullScreen>1</fullScreen>
  </client>
  <server>
    <!-- server base URL - leave this empty if you want to use only local cache -->
    <url>http://db.cs.helsinki.fi/~tkt_nokk/restsample/API/</url>
    <!-- how long we wait until using data from cache instead (in milliseconds) -->
    <maximumLag>1000</maximumLag>
    <!-- how long we wait until cancelling a query to the server (in milliseconds) -->
    <timeout>4000</timeout>
    <!-- how long until we try to refresh all tickets the data from the server (in milliseconds) -->
    <updateInterval>60000</updateInterval>
  </server>
</nokkis>
3.2.2 Tickets.xml & cache.xml format
<?xml version="1.0" encoding="UTF-8"?>
<nokkis>
  <event id="6">
    <name>Demoevent</name>
    <startdate>1240434000</startdate>
    <enddate>1241038800</enddate>
    <apikey>NOKKIS_CLIENT_DEMO</apikey>
    <barcode key="926379895">
      <status>0</status>
      <valid>1</valid>
    </barcode>
    <barcode key="635438222">
      <status>0</status>
      <valid>1</valid>
    </barcode>
    <barcode key="1105582317">
      <status>0</status>
      <valid>1</valid>
    </barcode>
    <barcode key="97805004">
      <status>0</status>
      <valid>1</valid>
    </barcode>
    <barcode key="2086253741">
      <status>0</status>
      <valid>1</valid>
    </barcode>
    <barcode key="388874777">
      <status>0</status>
      <valid>1</valid>
    </barcode>
    <barcode key="1393812836">
      <status>0</status>
      <valid>1</valid>
    </barcode>
  </event>
</nokkis>
3.3 Running the client & entrance procedure
First make sure that you have proper config.xml and tickets.xml files placed in the root of the Nokkis client folder. The client can be now launched with
./build.sh run
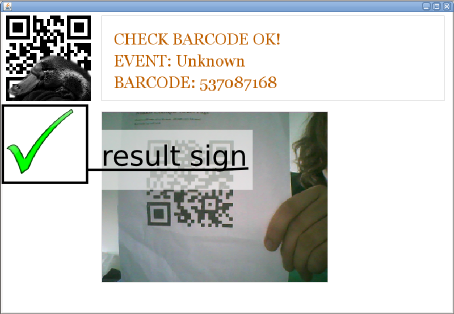
The client is ready to work when the text in the top bar in the graphical user interface says "Place the ticket in front of the web camera".

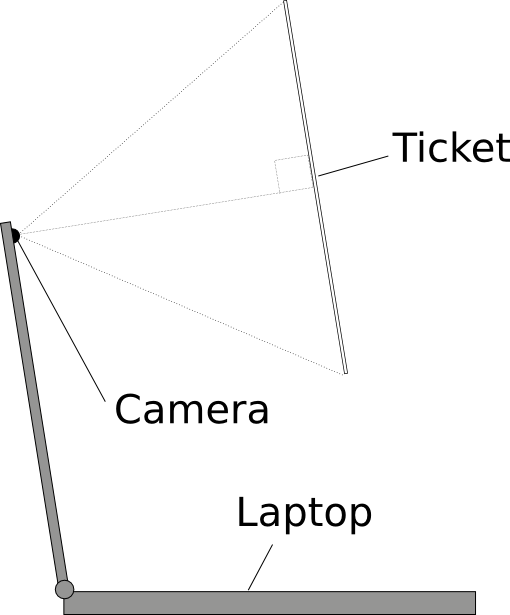
After that, a ticket can be checked by placing it in the front of the web camera of the client computer. The graphical user interface of the client features a camera view box showing what the camera sees. Using this you can make sure that the ticket is placed correctly and it can be recognized by the client. For the best possible recognizability of a ticket, you should make sure the ticket faces the camera nicely. Also lighting conditions should be taken care of, even though in most cases this shouldn't be a problem.
A possible client laptop setup & ticket placement:
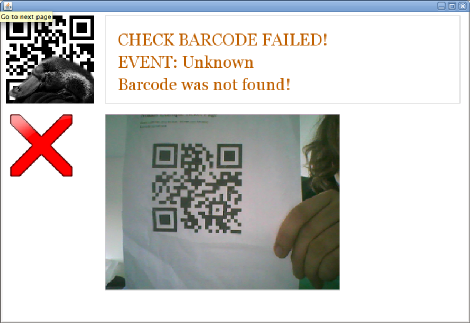
When client has recognized the barcode of the ticket, it shows a result information in the top bar and a result sign on the left and plays a corresponding sound:
- Barcode read ok: The barcode and the event were found, the event has already started but not yet ended, barcode was found unused and valid. Access should be granted. A positive sound can be heard.
- Barcode read failed: Access shouldn't be granted. A negative sound can be heard.
- Barcode was not found: A ticket corresponding to the barcode could not be found.
- Barcode is invalid: The ticket corresponding to the barcode has been set unvalid.
- Barcode is already used: The ticket has already been used.
- Event was not found: There is no event for the ticket shown.
- Event has not yet started: Event has not yet started.
- Event has already ended: Event has already ended.
If, for some reason, the client software or the computer running it crashes, the only thing you need to do is to relaunch the client application. The information about used tickets is recovered from the cache file and server.
You can quit the client application by pressing the q key or by closing the window (not in fullscreen mode).
4. Notes on known issues and features
4.1 Client
- None, at the moment
4.2 Server
- There is no real user support in Nokkis server API
- Database can store a minimal set of user data (user id, external id, email address), but none of the API functions accept any of the data
- Requiring the HTTP Request PEAR package for the Nokkis server installation was a result of having restricted access to db.cs.helsinki.fi server during development. In production use it'd be probably easier and cleaner to use PHP's own cURL extension.
- Server admin pages aren't feature-complete. For example sorting options and browsing to data on separate pages aren't fully implemented.
- Due to technical difficulties with PHP, update event in REST API is handled through HTTP/POST, not HTTP/PUT as intended.
5. Appendices
5.1 Links
5.1.1 Client related
- http://opencv.willowgarage.com/wiki/ - OpenCV Wiki, information about installation on
various platforms (Linux, Mac, Windows). - http://java.sun.com/ - Java SDK downloads and documentation.
- http://ant.apache.org/ - Apache ANT homepage and downloads.
- http://www.mingw.org/ - MinGW and MSYS downloads.
- http://www.macports.org/ - MacPorts needed for Mac OS X installation.
5.1.2 Server related
- http://www.php.net/ - PHP installation, downloads and documentation.
- http://pear.php.net/ - PHP / PEAR website.
- http://www.mysql.com/ - MySQL installation, downloads and documentation.
- http://www.apache.org/ - Apache Foundation homepage. Apache httpd downloads.