PICSearch v3.0 User's Manual
Contents
1 Introduction
PICSearch is a development environment for content-based image retrieval
algorithms. Its main purpose is to serve as a testing platform during the
development of such algorithms. PICSearch can, however, also be used as a
conventional image cataloging program. The idea is that the user can load
an image into the system and search a database for pictures resembling the
query image. The definition of resemblance depends on the search algorithm
used for the query. Researchers may add their own algorithms to the system
by filling in an algorithm template and recompiling the system.
PICSearch v3 is divided into a server and a client application. The
server is a background process and all its services are used via the
graphical user interface (GUI) of the client. Queries executed by the
client as well as all database management are done by forwarding requests to
the server. Thus all database access is completely hidden from the client.
Authentication and security issues are also handled by the server. The
network protocol used in the server/client communication is TCP/IP.
1.1 Release Notes
This version of PICSearch introduces caching of thumbnail images which
will improve the performance of repeated queries using the same database.
This is especially true if the network connection used is slow or busy.
The user interface of version 3 also includes some enhancements, including
alternative main window sizes and new configuration options.
Some functionality of the system was moved from the client to the server.
This has no effect on the usability of the system and should only be of
concern to those interested in further developing the system. Anyone
intrigued should take a look at the development documentation and the
source code.
PICSearch is freely available under the GNU General Public License.
1.2 About This Document
This document describes every aspect of the PICSearch system and includes
thorough instructions for setting up the system, executing queries and
maintaining the databases needed by the program. The text herein is
intended for all users of the system - whether your interest lies in
algorithm development or image cataloging you should read this document
to understand how to use the system to its full potential. The fastest way
to learn is to experiment with the program while following the instructions
given in this text. No previous knowledge (aside from a rudimentary
familiarity with Linux) is required, although basic knowledge of image
processing and databases may help in understanding some of the concepts
used in PICSearch. Refer to the Glossary should you encounter unfamiliar
terms.
1.3 Contact Information
For more PICSearch related material and contact information refer to
http://www.cs.Helsinki.FI/~klemstro/picsearch/
2 Setting Up the System
As of now PICSearch has only been run on Linux. Thus the following
instructions have been written especially for Linux systems, but porting to
other Unix environments should not prove difficult as the amount of system
dependent code has been kept to an absolute minimum.
2.1 Prerequisites
In order to run PICSearch v3 you will need the Tcl/Tk distribution version
7.6/4.2. We cannot guarantee that the system will operate correctly if you
use a version earlier or more recent than the one specified.
No special hardware is required. Screen resolution must be 800x600 or
more for the main window to fit on the screen. For convenient usage we
recommend using a window size of 1024x768.
2.2 Compiling the System
The system has been compiled using the GNU C++ compiler (gcc) and GNU Make.
Below is a step by step guide on how to set up PICSearch v3.
- Download PICSearch3.0.tgz
- Unpack the package
tar -xzf PICSearch3.0.tgz
- Make sure that you have Tcl/Tk version 7.6/4.2 properly installed. If
not, download the package (e.g. from
http://www.neosoft.com/tcl) and follow its installation instructions.
- Check the make files of PICSearch v3 for library and include directory
paths. Compile the system
cd picsearch3
make
That's it! You're ready to take the system for a test drive.
2.3 Testing the System
All PICSearch clients need a server in order to be usable. The first time a
server is started a new user database is initialized. This includes creating
a superuser account (with a predefined password) for the system. User names
and passwords can of course be changed once the system is up and running.
After compiling the system start up a server in a console simply by
executing the picserver binary from the picsearch3 directory. Note that
the directory where the binary is started from is important since all database
access is done relative to this directory.
Then launch the client by executing the picsearch binary. Once
both the server and the client are up the first task is to connect to a server
- in this example we use the local server we just started.
- Select Server->Connect->Localhost from the menubar.
- Type "SuperUser" as your user name.
- Type "ResuRepus" as your password.
- Click Ok to connect.
You should now see the server banner. Click Ok to close it. You are
now logged on to the server. Since this is the first time the system is up
there are no databases yet. To create one, follow these steps.
- Select Server->Database Management from the menubar.
- Click the button labeled Create Db to make a new database.
- An entry field will appear in the Databases listbox: type a name of
your choice for the new database and press Return when done. The entry can be
canceled by pressing Esc.
- When you select the database you just created (by clicking on its name)
the search algorithms applicable to this database are shown in the Database's
Algorithms listbox. As a default all available algorithms are selected - there
is no need to change this, just click Ok to create the database and
close the database management window.
You should now see the database you just created in the Databases
listbox on the main window. A database is of no use if it has no images, so
the next thing we'll do is insert some. For this phase you will need some
image file(s) in a format recognized by PICSearch (JPEG, GIF, PPM, or Sun
Raster).
- Select Image->Open Query Image to open a new image. This will
bring up a filename requester.
- Select an image file (in one of the formats listed above) and click
Open. If PICSearch is unable to open the image you specified an error
message will be printed in the Info box in the main window. Try again with a
file that you know to be in an accepted format.
- The image you just loaded will be shown in the Query Image frame in the
main window. Make sure the database you just created is selected. If it
isn't, select it by clicking its name in the Databases listbox. Now insert
the image you opened to the database by selecting Database->Insert Query
Image into Database.
Let us now try to make a simple query.
- Select an algorithm to use in the query by clicking on one of the
algorithm names listed in the Algorithms listbox. Since we're just testing,
it doesn't make any difference which algorithm you choose.
- Now start the query by clicking the Query button.
- If the algorithm you chose requires parameters, a parameter window will be
brought up. If this happens, just use the default parameters and close the
parameter window by clicking Ok.
- Since there is only one image in the database the the query progress
window should just flash on the screen and disappear almost instantly. The
image you inserted into the database should now be displayed also in the Query
Results frame.
You have just executed your first query. Now read the rest of this
document to find out more about the functions mentioned above.
3 General Usage
Before starting PICSearch you should set the environment variable PICSEARCH
to point to the root directory (the directory containing the executables) of
the application's directory structure.
In Unix (using tcsh-shell): setenv PICSEARCHDIR <dirname>
If this environment variable isn't set, you need to start PICSearch
from the above mentioned root directory or the program won't be able to find
the files it needs in order to run. If, on the other hand, the variable
exists, it doesn't matter where the executable is started from.
The server is started by typing picserver on the command line. Note
that the directory where the binary is started from is important since all
database access is done relative to this directory. The server reports what
it is doing and whether there have been any errors by printing messages in
the console window it was started from.
The client is started by typing picsearch on the command line.
This will bring up the GUI of the client (see Figure 1.)
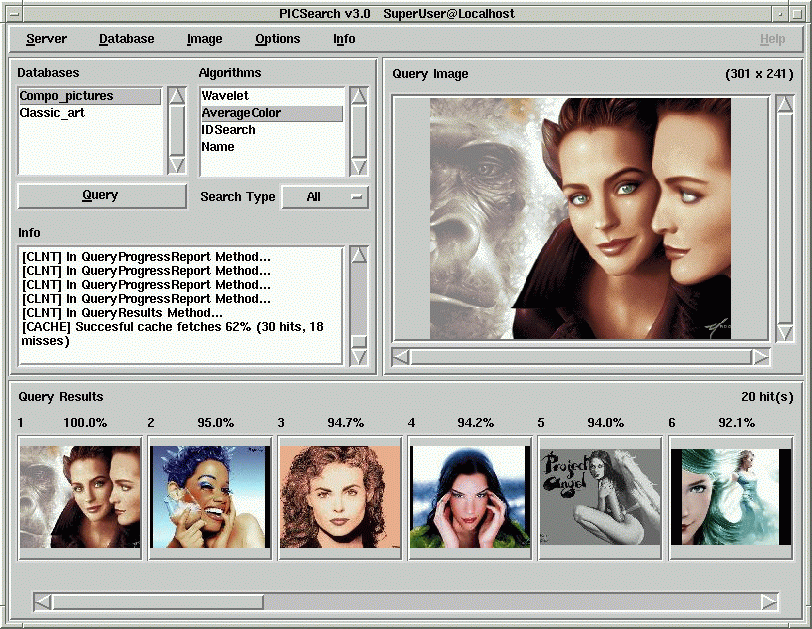
Figure 1: The graphical user interface of PICSearch v3.
The main window consists of four distinct components: the menubar, the
control panel (the Databases & Algorithms listboxes and the Info textbox) and
the Query Image and Result Images frames. The positioning of these components
depends on the window size used, but they will always be clearly labeled
and the only elements visible in the main window. The details of each
component are described later in this document along with the functions
that affect them.
The PICSearch client is virtually useless if it isn't connected to a
server. A connection is established by selecting any item in the
Server->Connect submenu. Selecting Remote Server will bring up
a dialog asking you to enter a server name, a user name and a password (see
Figure 2.) Selecting Localhost will bring up
a similar dialog, but the server and user names have been filled in. You
can edit the the username to whatever you wish by simply selecting the
entry field with the mouse or tabulator key and retyping the username.
The Connect submenu may contain other items in addition to those
described above - these are shortcuts to recently used servers. Selecting
one of them will bring up the connect dialog with the server and user names
filled in with appropriate values.
Note that regardless of the menu selection you made, you may always
change the server and user names simply by editing the fields.
Pressing the Ok button will attempt to establish a connection to
the server you specified, pressing Cancel will close the connect
dialog without attempting to establish a connection.
Once you are connected to a server, you may disconnect at any time by
selecting Disconnect from the Server menu. Any open
connection will also be closed when exiting the program.
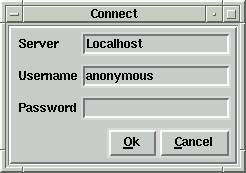
Figure 2: The Connect dialog.
Server options may only be edited when there is an open connection and the
user has superuser rights. If this is the case, then selecting Options->Edit
Server Options will bring up the Server Options window (see
Figure 3.) The options are
- Maximum Number of Connections How many simultaneous connections
the server accepts.
- Disconnect Timeout in Minutes How many minutes of inactivity the
server tolerates before closing the connection. If set to 0, the
connection is kept up indefinitely.
- URL The server's HTTP address.
- Server Advertisement The server's advertisement text shown at
connect time.
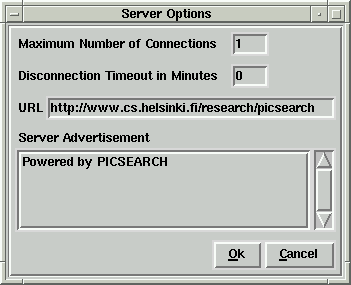
Figure 3: The Server Options window.
Selecting Options->Edit Client Options will bring up the Client Options
window (see Figure 4.) These are general system
wide options that are saved when you click Ok in the Client Options
window. The options are
General Options. These options affect the general behavior of the system.
- Copy Images to Database Physically When disabled only the filenames
of images are saved to the database (when no filename is known, the actual
image data is saved instead.)
- Show Server Ad at Connect Time When enabled, the server's
advertisement banner is shown every time you connect to the server.
- Ask Algorithm Parameters When enabled the user is asked to set the
parameters of the query algorithm every time a query is initiated.
- Show Aborted Query When enabled the results of a query are shown,
even if the query was aborted.
- Scale Query Image When enabled the query image is scaled to fit
the Query Image frame in the main window. Note that this is done only for
display purposes - if the image is inserted to the database, the original
image is inserted, not the scaled version.
Debug Messages. These options switch debug output on/off for different
parts of the system.
- PicGUI
- PicCore
- PicAlgorithm
- PicDb
- PicCache
Miscellaneous Options.
- Window This allows you select one of three different main window
sizes. The subwindows of the system are always the same regardless of main
window size.
- Cached Thumbnails The size of the cache (i.e. how many thumbnail
images are kept cached.) The value you give is always rounded to the nearest
value more effective for the cache. Setting this to 0 turn the cache off.
Query Options. These options affect the result set of a query.
- Query Result Images The maximum number of result images. The
result set has never more than this number of images, no matter how large the
database being queried is.
- Minimum Match Percentage This is another method of limiting how
many result images a query produces: no images with a match percentage smaller
than this will be included in the result set.
External options. These options set which applications to run when
external programs are invoked.
- WWW Browser Which program to invoke when Go To WWW (in the
server information/banner window) is invoked.
- Image Editor Which program to invoke when Image->Image Editor
is invoked.
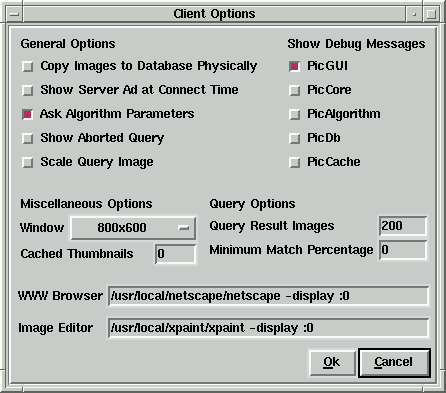
Figure 4: The Client Options window.
Selecting Server->Quit will close any open connection and end
PICSearch execution. Note that this only terminates the client - the server
process must be terminated manually by issuing a CTRL-C in its console or
killing the process.
No queries may be made without query images.
A new query image is opened by selecting Image->Open Query Image.
This will bring up a filename requester asking you to select a file to open
(the image to be opened must be in a format accepted by PICSearch: a JPEG,
GIF, PPM, or Sun Raster image.) Once you have selected the file, click
Open to open the image - this will add a new query image to the
system (thus not destroying any other open query images.) If no more query
images can be opened or the image is in a format not recognized by PICSearch,
an error message is given.
The active query image (the one shown in the main window) may be closed
by selecting Image->Close Query Image. This will make the next
query image (if there is one) the active one.
The query image's name and dimensions are displayed above the actual
image in the main window.
The active query image may be saved to disk by selecting any item from the
Image->Save Query Image As submenu. The items in this menu are
file formats and selecting one of them will open a dialog asking for a path
and filename. If the filename dialog is not canceled, the active query image
is saved in the format determined by the menu selection. The proper extension
is added to the filename if it didn't have one.
Several query images may be open simultaneously. Open query images are
listed as items of the Image->Available Images submenu. Selecting
any item from this menu will make the selected image the active query
image.
Once a query has finished and the results are displayed in the Query Results
frame, images may be copied from the result set to query images. You can
make a new query image of either the selected thumbnail (shown as raised) or
the entire image represented by that thumbnail by selecting Image->Get
Selected Thumbnail or Image->Get Selected Image, respectively.
Just like with opening query images a new query image is created out of the
selected database image and no existing query image is destroyed. Note that
these operations are not be available to users with insufficient authorization.
Selecting Image->Image Attributes opens the Image Attributes window
(see Figure 5.) Here you may see the image's width,
height, filename, id, name and description. The image's id is 0 if the
image hasn't been inserted to a database. Only the name and description
fields may be edited. Note that any changes you make in this window will
only be stored if you insert the image into the database after the changes.
The window also has a listbox containing algorithm names. Selecting one
of these names shows a textual representation of the signature computed
using that algorithm in the adjacent textbox.
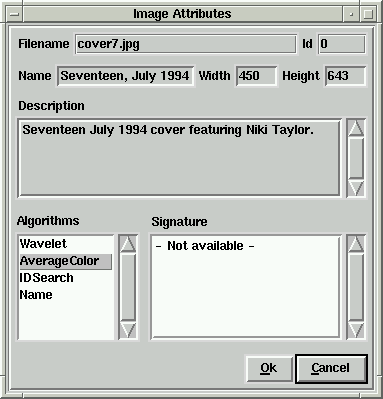
Figure 5: The Image Attributes window.
To be able to start a query you must have an active query image and select
the database and algorithm to use. If all of these conditions are nor met,
the Query button is shown as ghosted and clicking it has no effect.
The listbox labeled Databases in the main window shows the databases available
to the current user (i.e. the databases the user has been authorized to access.)
The database to query is selected simply by clicking on one of the names in
this listbox. Selecting a database displays its algorithms in the
Algorithms listbox.
The listbox labeled Algorithms in the main window shows the algorithms
applicable to the current database. The algorithm to use in the query is
selected simply by clicking on one of the names in this listbox.
Once you have opened a query image and selected the database and algorithm
to use, you can start the query by clicking the Query button in the
main window. If the selected algorithm has parameters the user can adjust
(and the Ask Algorithm Parameters option is on) a parameter window will be
displayed where the user may set the parameters of the algorithm to his/her
liking.
While the query executes, its progress is reported in a small window
(see Figure 6.) This window also has an Abort
button, clicking which will abort the query.
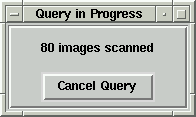
Figure 6: The Query Progress window.
Once a query finishes, its results are displayed in the Query Results frame
of the main window. For each result image its ranking, match percentage and
name is shown. The set of result images may be scrolled using the the scrollbar
below the images and a result image may be selected by clicking it. The
selected result image may be copied to a query image (see
4.4) or deleted from the database (see 7.4).
The user management window (see Figure 7) is brought
up by selecting Server->User Management. This is only available to
users with superuser rights.
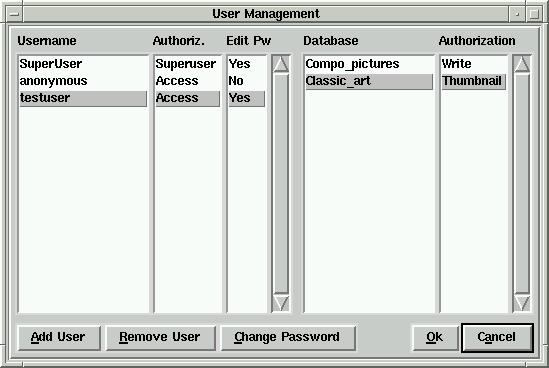
Figure 7: The User Management window.
New users may be added by clicking Add User or by double right
clicking in the Username listbox in the User Management window. Either of
these ways brings up an entry field in the Username listbox into which a
new user name may be typed. The addition can be canceled by pressing Esc,
or accepted by pressing Return. A new user's password is the same as the
username by default and he is given default authorization values to the
server and each of its databases. See below for how to change these.
The selected user can be removed by clicking Remove User.
In the User Management window the selected user's password can be changed
by clicking Change Password - this will bring up a dialog asking for
a new password. The password has to be retyped to make sure it is correct.
A user may change his/her own password (if the user in question has been
authorized to do so.) by selecting Server->Change Password. The
procedure is similar to user management, except that the user has to give
his/her old password as well. Users with superuser authorization need not
give their old password.
Any user's server authorization may be changed in the User Management
window by selecting a user and clicking and holding the left mouse button
down in the Authoriz. listbox. This will bring up a popup menu from
which an authorization of either None (no access to the server), Access
(normal access rights) or Superuser (administrator rights) may be selected.
Whether or not a user is allowed to change his/her password is selected in
exactly the same way by clicking on the Edit Pw listbox.
The user's database authorization for each database is selected in a
similar fashion by clicking and holding in the Database Authorization
listbox. A database authorization may be one of None (no access), Thumbnail
(the user may query the database and copy thumbnail images), Image (the user
may query the database and copy thumbnail and original images) or Write (the
user may query the database and copy images and insert new images).
Clicking Ok in the user management window will make all changes
permanent. Clicking Cancel will abandon all changes and leave the user
data as it was when entering User Management.
The database management window (see Figure 8) is
brought up by selecting Server->Database Management. This is only
available to users with superuser rights.
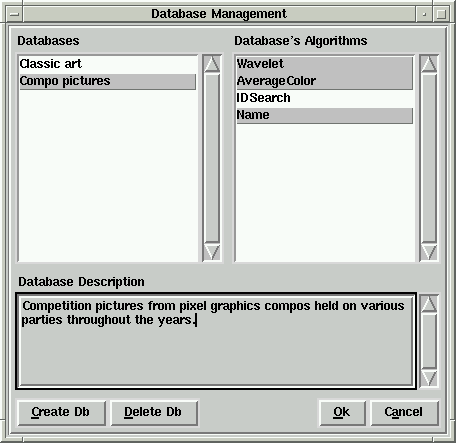
Figure 8: The Database Management window.
New databases are created by either clicking Create Db or double
right clicking in the Databases listbox. Both methods bring up an entry
field into which the name of the new database may be typed. The addition
can be canceled by pressing Esc, or accepted by pressing Return. By
default a new database has all the algorithms available at the server.
The selected database may be removed from by clicking Delete Db.
This deletes the database from disk, but note that if only image filenames
were stored in the database (i.e. the Copy Images to Database Physically
option is off), the actual image files are left untouched.
The algorithms a user may apply to a database are selected by simply
clicking on their names in the Algorithms listbox.
Clicking Ok in the database management window makes all the changes
permanent. If you wish to discard any and all changes you may have done,
just click Cancel.
To insert a single image into the selected database select Database->Insert
Image into Database. This will bring up a filename requester asking you to
select the image file you wish to insert. If the file you selected is not
recognized by PICSearch, an error message is displayed in the Info box.
To insert multiple images in one go, select Database->Batch Insert Images.
This will also bring up a filename requester. Selecting a file with the
extension .lst means that the file is a list file (i.e. it contains the paths
and names of the files you wish to insert) and all the files listed in this
file will be inserted to the selected database. Selecting any other file will
insert all the files in that directory to the selected database.
Batch Insert prints its progress reports to the Info box and if it failed
to insert any images, it reports this once the batch insertion is finished.
Note that Batch Insert will always report that it failed to insert
(at least) two images: this is because PICSearch also attempts to insert the
directory entries "." and ".." into the database. This message is annoying,
but quite harmless.
Adding new algorithms requires some knowledge of the inner workings of the of
the system. The following steps have to be taken.
- The variables for the signature have to be added to the Signature
class implementation. Writing/reading these variables to/from a memory buffer
is done using the functions getBin and setBin.
- The controlling parameters of the function have to be added to the
Algorithm class implementation. Reading/Writing these parameters is
done using the functions getParams and setParams.
- A new parameter window has to be created for the GUI. Your Tcl/Tk script
must contain a call to makeAlgParamWin. This procedure returns a
frame inside which you should pack all the widgets you need. The values of
your parameters must be contained in an associative array called
algParams. The subscripts of this array must be integer values
starting from 0 unto the number of parameters -1. That is, if your algorithm
requires 3 parameters, their values must be in the Tcl variables
algParams(0), algParams(1) and algParams(2). Finally the Tcl/Tk script
implementing the parameter window must be named PicAlgParWin<id>.tk
(where <id> is the Id of your algorithm) and stored in the directory
source/alg/src/. Just study the .tk files in that directory to see
how they work.
- The actual computation of the signature has to be coded and the values
are to be set into a new instance of the Signature class.
- A method for comparing two signatures has to be coded. The distance
between two given signatures is calculated out of this representation and the
result is scaled to the required interval.
Glossary
A query is executed to fetch images from the database that bear
as close a resemblance (judged by the algorithm used) to the query image as
possible. The results of a query are the images of a database sorted by
their associated match percentages.
A query image is compared against the images in the database and
each database image is given a match percentage that is the higher the
more the two images resemble each other.
Search algorithms are used to compare the query image and the
database images. Each algorithm has its own way of determining how much two
images resemble one another: a signature is computed for each image and the
signatures of the images (not the actual images) are compared when doing
queries.
Signature is a compact representation of image data used to
summarize the contents of an image. A signature algorithm computes the signature
for an image.