CoMa - User GuideContents
1. CoMa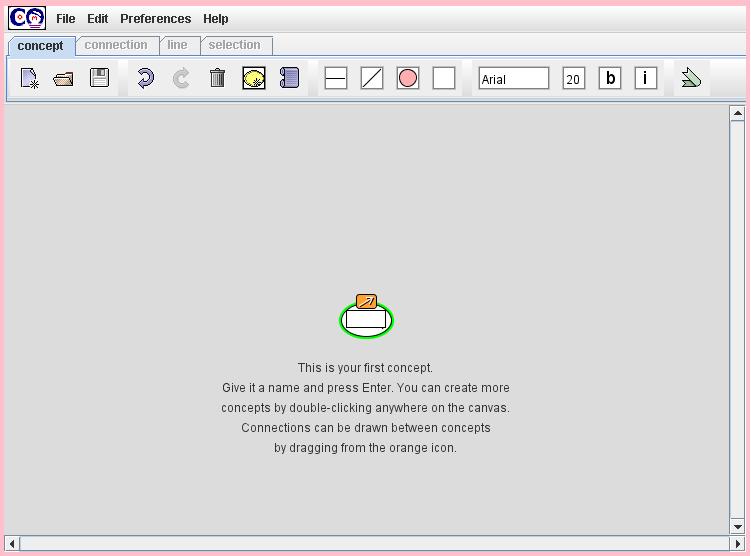 2. Running the Applet
Run the applet by loading the website:
Please reply "Yes" to the appearing Security pop up. CoMa will not harm your computer in any way. It only needs the
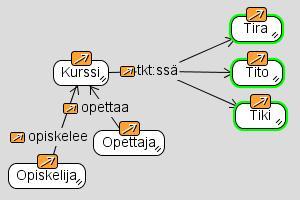
permission to access your hard drive when saving a concept map file. 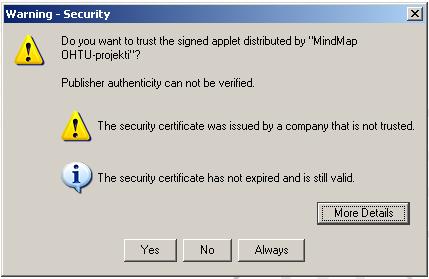 3. FunctionsCreating a conceptDouble-click the canvas or hit Enter, when no element is selected. You can also drag the connection icon of an element to a desired position on the canvas. This operation creates a new connected concept. |
|||||||
 |
Create a new concept to random location | ||||||
 |
Connection icon | ||||||
 |
Concept | ||||||
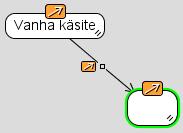 |
Connected Concept | ||||||
Creating a connectionDrag the connection icon of an element onto a concept or a connection. Note: A connection cannot be created between two connections. |
|||||||
Selecting elementsOne or more elements close to each other can be selected with the mouse by drawing a square around the desired elements. Elements situated in different parts of the canvas can be selected by holding down the CTRL key while choosing the elements with the left mouse button. |
|||||||
 |
Square | ||||||
 |
|||||||
 |
Selected elements | ||||||
Naming the elementCreate or select an element. Type the name by using the keyboard. Removing an elementSelect the element/elements you wish to remove from the canvas and press the Del key or the Remove icon on the toolbar. |
|||||||
 |
Remove selected element(s) | ||||||
Commenting elementsPick an element. Click the Comment icon on the toolbar. You can type or paste a comment or an URL address into the comment window. |
|||||||
 |
Comment the selected element | ||||||
Modifying the appearance of conceptsPick a concept. You can modify the font size by dragging the size icon. The concept's shape, background color and name font can all be modified with the respectful menus on the toolbar. |
|||||||
 |
|||||||
 |
Size icon | ||||||
 |
Box border width | ||||||
 |
Box border style | ||||||
 |
Box shape | ||||||
 |
Box color | ||||||
 |
Font | ||||||
 |
Font size | ||||||
 |
Bold | ||||||
 |
Italic | ||||||
Modifying the appearance of connectionsPick a connection. The width and type of the line can be modified with the respectful menus on the toolbar. |
|||||||
 |
|||||||
 |
|||||||
|
|
Font | ||||||
|
|
Font size | ||||||
|
|
Bold | ||||||
|
|
Italic | ||||||
 |
Locate connections freely | ||||||
|
|
Line width | ||||||
|
|
Line Style | ||||||
 |
Show arrowhead | ||||||
Undo, Redo |
|||||||
 |
Undo | ||||||
 |
Redo | ||||||
Setting the element appearance as a defaultPick an element. Set its appearance as a default for new elements by clicking the Set as default icon on the toolbar. |
|||||||
 |
Set selected element's style to be the dafault style for new elements | ||||||
Naming order of concepts and connectionsOpen the Preferences menu. Check the order in which you wish to name the concept and connection when creating a connected concept. |
|||||||
 |
Element namig order
|
||||||
Modifying the Visibility of element iconsOpen the Preferences menu. Select the option Hide element icons to make the icons visible only when moving the mouse cursor near an element. |
|||||||
|
|
Hide element icons | ||||||
Saving the concept mapPress the Save icon on the toolbar. Enter a name for the concept map file and select the folder into which you wish to save it. Click "OK". |
|||||||
 |
Save | ||||||
 |
|||||||
Saving the concept map as an imageSelect the option. Save as image from the File menu. Enter a name for the concept map and select the folder into which you wish to save the image. Click "OK". |
|||||||
 |
Save as image | ||||||
Printing the concept mapSelect the Print function from the toolbar or from the File menu. |
|||||||
 |
|||||||
 |
|||||||
Opening a concept mapSelect the Open function from the toolbar or from the File menu. |
|||||||
 |
Open a concept map from file | ||||||
Creation of new concept mapSelect the concept map creation function from the toolbar or from the File menu. |
|||||||
 |
Create a new consept map | ||||||